


 $
$WELCOME TO THE NATIVE FLUTE MANUAL – NAF
If you made it here, it’s because you received one of our native flutes! So read carefully and absorb all the information below!
If you made it here, it’s because you received one of our native flutes! So read carefully and absorb all the information below!
Before playing, always bring your flute to room temperature. This is especially important when the flute has been, say, transported in the cold outdoors to warm up indoors. You can warm the flute with your hands by rubbing them over the flute and blowing into the tube with the holes closed; this helps bring the flute to its tuning temperature, which is between 25 and 30º, because when the flute is very cold, the tuning can drop by up to ½ tone.
Do not play your flute in environments with very low temperatures, as this can cause cracks in the flute due to thermal shock. To measure tuning, the flute must be at a temperature between 25º and 30º Celsius.
Protect your flute from thermal and physical shock:
The main cause of bamboo flute failure is through cracking. The body of the bamboo flute is composed of thousands of longitudinal fibers that run through the bamboo. A small crack at one point can propagate along the entire length. Cracks are most often caused by exposure to extreme temperatures, humidity, and strong impacts.
It is very important to remember not to leave your flute exposed to the sun or inside a hot car for long periods. Store it in a dry, well-ventilated place. The flute needs to “breathe”; never leave it stored for a long time in an airtight container.
After playing your flute for a while, clean and dry the mouthpiece and the table area (nest) where the block/totem sits. This is especially important in colder climates due to condensation.
Do not use cleaning products on the outside; only use a dry cotton cloth.
After playing, leave the flute in a vertical or tilted position. This helps drain any accumulated moisture. Do not store the flute while it is not yet completely dry, to avoid encouraging the development of fungi on the inner wall.
Avoid playing in ambient conditions with very low temperatures:
The warm breath entering the hole expands rapidly inside, but the outer surface remains cold and unexpanded, which can cause a crack.
The correct position of the block (totem) in relation to the whistle is important, as it will define the quality of the sound produced. The block is tied with a leather cord. It is not glued, as there may be a need to loosen it to unclog the air passage or for cleaning, as well as to adjust its distance from the whistle to find the best tuning position for higher or lower notes.
If the ambient climate is at a low temperature and/or has high humidity in the air, the heat from your breath may moisten the air passage of the totem and clog it. If this happens, simply blow hard to unclog it. As a last resort, move the totem away and clean the passage.
When positioning the block, note that below the block there is a tunnel that directs air to the whistle’s entrance; this tunnel (chimney) must have its opening facing the whistle’s entrance.
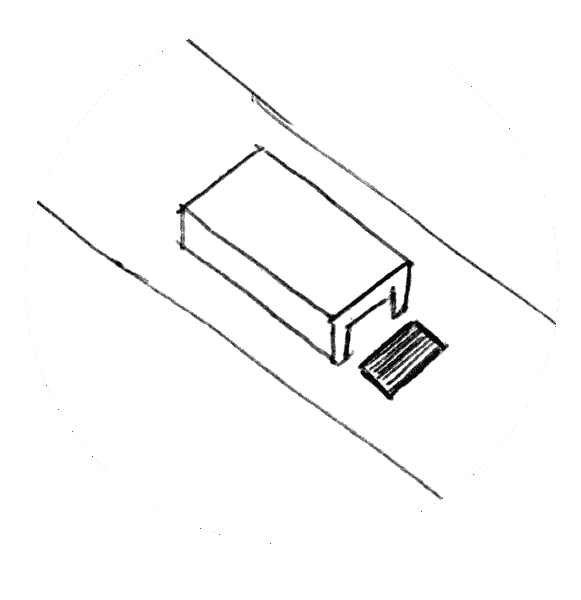
With the block/totem moved away from the whistle, the tuning rises slightly and the sound may become airier
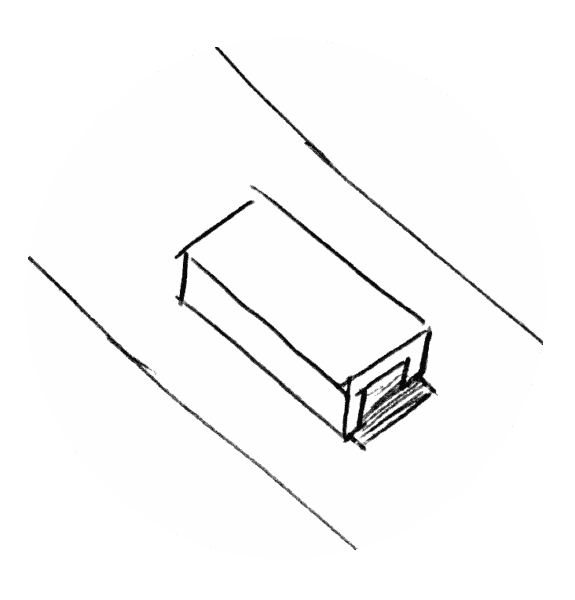
With the block/totem positioned very close to or over the whistle, the lowest note may not sound with good projection and tone.
Generally, the block should be positioned 1mm before the start of the whistle, but experiment a lot and get familiar with this adjustment, as a 0.5 mm shift forward or backward can influence the timbre, and this varies from flute to flute.
The sound should be easy to produce. There’s no need to cover the mouthpiece with your lips or open your mouth wide; just blow gently into the mouthpiece, like blowing out a candle.
With all holes closed, we have the flute’s lowest note. This note should be blown with little intensity; gradually blow from soft to strong until you notice the maximum intensity that can be applied for the lowest note’s sound. That is the breath pressure limit for producing the note, which is when the low sound becomes high-pitched or distorted.
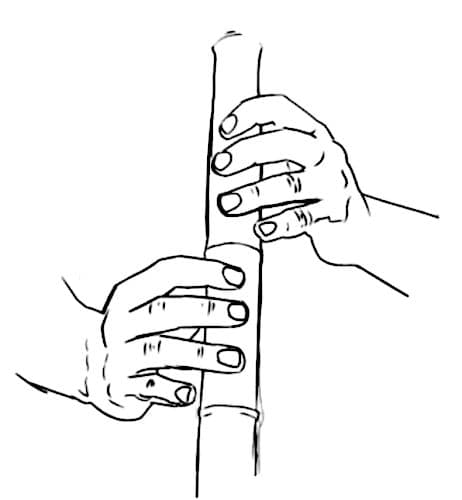
The vast majority of flutes are made with the standard of the left hand on the upper part and the right hand on the lower part of the flute, using the left index finger to cover the first hole above and the middle finger to cover the second hole.
The left ring finger acts as support on the flute or covers the 3rd hole (for 6-hole flutes). On the right hand, the index, middle, and ring fingers cover their respective holes, and the pinky finger can also be used for support.
The thumbs provide support on the underside. The part of the finger that covers the hole is the distal phalanx (fingertip pad).
There’s no need to press hard with your fingers to close the hole; just let your sense of touch feel the hole until you get used to covering it completely without letting air escape.
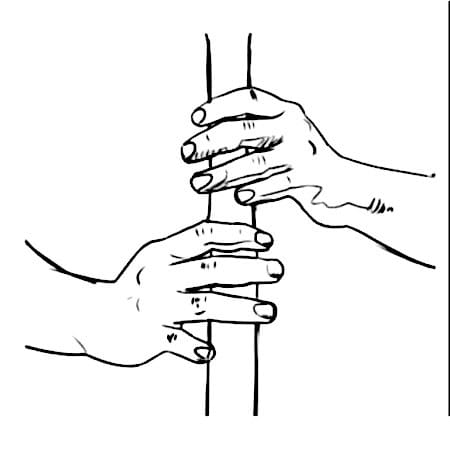
Try to keep your fingers perpendicular to the flute or slightly tilted.
Always think about keeping your entire hand and wrists very relaxed. Try not to lift the fingers that aren’t covering holes too high. The closer they are to the hole, the faster they’ll arrive when it’s their turn to work.
But don’t keep them too close, as this can affect the tuning of the note produced from that open hole.
When the flute is large and has greater spacing between holes, we can use the middle phalanx to cover the holes with a “fan” motion of the fingers. Experiment and see what works best for you.
Lubrication of the flute only occurs internally. Don’t worry about lubricating it during the first 6 months of use.
Our flutes survive very well without lubrication due to the process we use to seal the bamboo fibers. Even so, there’s no problem lubricating it regularly, especially if the climate in your region is very dry.
We recommend using vegetable oils, such as: mustard, walnut, sesame, olive, coconut, grape, tung, etc… Do not lubricate a flute that is still damp. Let the inner surface of the mouthpiece dry. Lubrication should be internal; avoid getting oil on the flute’s external finish.
For cleaning and drying, use a thin rod. Attach a cotton cloth to one end, apply the oil to the cloth, and rub it on the inner walls of the flute. Bottle cleaners are also useful for removing dust accumulated inside the tube.
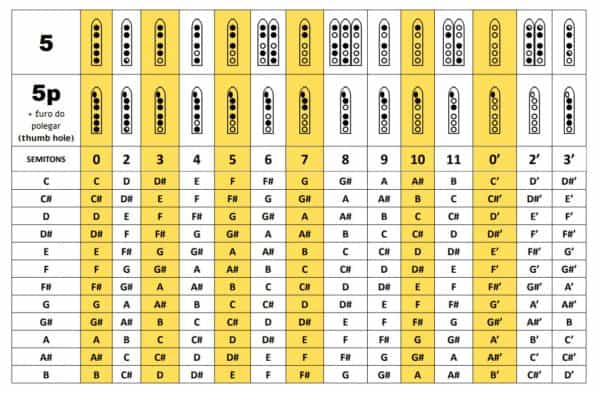
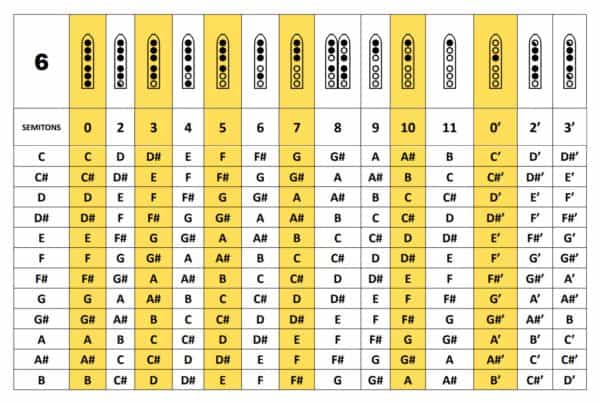
Check how many holes your flute has and download the corresponding chart. Click on the image next to it and see the complete fingering chart for the 3 types of native flute with 5, 6, or 7 holes. The scale starts with the first note with all holes closed.
The highlighted columns are the notes of the flute’s native musical scale. The other notes are optional, should be tested, and may suggest cross-fingering or half-hole variations to sound in tune.
After some time, the protective cord may come loose from the flute.
In this video, I’ll show you how to do the new stringing. We usually use a 1mm line waxed with paraffin.